Do you know the right steps for how to change generator oil?
Keeping your generator properly maintained with regular oil changes is absolutely critical for its longevity. But what’s the best way to change the oil yourself?
Not to worry – changing your generator’s oil is an easy DIY job anyone can do in their garage or driveway. With just some basic tools and supplies, you can keep your generator running optimally for years to come.
In this comprehensive guide, we’ll walk through a complete step-by-step process to change your generator’s oil safely and hassle-free.
You’ll learn all about when to change the oil, what oil type to use, and how often to change it, plus a full tutorial showing you exactly how to drain old oil and refill it with fresh oil.
Also Read: Smallest Portable Generators
If you want to keep your generator in peak condition with your own two hands, let’s dive into everything you need to know about how to change the oil in your generator!
Do I Really Need to Change My Generator’s Oil?
I know what you might be thinking – oil changes seem complicated and time-consuming. Plus, your generator runs just fine, so why mess with it?
Here’s the deal: Oil is the lifeblood of your generator’s engine. It keeps critical components lubricated and prevents excess wear and tear. Over time, oil breaks down and becomes contaminated with particles and fuel residue.
If you don’t change the oil regularly, it loses its ability to properly protect your generator’s inner workings. That leads to damage, increased emissions, and ultimately shortened engine life. Not ideal!
Most generator manufacturers recommend changing the oil every 50-100 hours of use. But even if you use your generator infrequently, you should still change the oil at least once a year.
Fresh oil improves performance and makes starting easier. A routine oil change gives you peace of mind knowing your generator is ready to go when you need it. Think of it like getting a tune-up for your engine!
What You’ll Need to Change Generator Oil
Generator oil changes are relatively quick and painless. Here’s a look at the basic tools and supplies you’ll need:
- Drain pan – Use a large pan or bucket to catch used oil. Avoid plastic if you can.
- Wrench (or ratchet) – For loosening the drain plug and oil filter. An adjustable wrench usually works.
- Funnel – For cleanly pouring in new oil. Some generators include one.
- Rags – For wiping up spills and drips. Paper towels also work in a pinch.
- Gloves – Disposable gloves to keep hands clean.
- Oil filter – If equipped; check your manual.
- New oil – Amount and type vary by model. Refer to your manual.
- Blocks – For elevating the generator to access the drain.
- Manual – Contains oil capacity, type, filter info, and procedures.
Pro Tip: Lay down cardboard under your generator to prevent oil drips on concrete. You may also want an oil filter wrench for easy removal.
Always check your manufacturer’s manual since oil capacities and types differ between generator models. Most take 10W-30 or 5W-30 conventional motor oil.
How To Change Generator Oil
Now let’s go step-by-step through the generator oil change process:
Step 1. Run Generator to Warm Oil
Before draining the old oil, run the generator for several minutes to warm it up. This thins the oil so it drains quickly and completely.
Just run the generator at idle or under 25% load for 3-5 minutes. Avoid operating it without load for more than 10 minutes to prevent damage. The oil doesn’t need to be hot, just warm to the touch.
Once warmed up, shut off the generator and allow the lubrication system to settle for 1-2 minutes. This allows any suspended particles to settle to the bottom of the oil sump.
Step 2. Elevate Generator and Access Drain Plug
Place wooden blocks beneath the generator to raise it several inches off the ground. This allows easy access to the oil drain plug which is positioned on the bottom of most units.
Ensure the generator is completely level and stable on the blocks. You don’t want it tipping over!
Also, take care not to place blocks directly under hot areas of the generator, like the muffler outlet. Position them to avoid high heat zones.
Step 3. Locate the Oil Drain Plug and Position the Drain Pan
Consult your owner’s manual to locate the oil drain plug, which is typically on the front-bottom area of the engine.
Many plugs have a square or hex head that requires a 3⁄8” socket or wrench for removal. Place your drain pan beneath the plug since oil will begin flowing out quickly once removed.
Step 4. Remove the Oil Drain Plug Slowly
Using your socket or wrench, begin turning the drain plug counterclockwise to loosen it. Go slowly to avoid stripping. The plug may be on tightly, especially if overtightened previously.
Once breakaway torque is reached, you can unscrew the plug completely by hand. Allow all the oil to drain out into your pan, which may take 2-5 minutes.
Take care not to lose the drain plug or its washer since you’ll need to reinstall it. Set it aside in a clean spot for now.
Step 5. Change the Oil Filter if Equipped
Many generators have an oil filter that also needs to be replaced periodically. Like your car’s filter, this screens out contaminants from the circulating oil.
Use an oil filter wrench to remove the old filter. Turn counterclockwise to loosen, then unscrew it by hand. Allow the oil inside to drain, then discard the old filter properly.
Wipe the filter mounting surface clean and coat the oil filter gasket lightly with fresh, clean oil. Then thread on the new filter by hand until snug.
Step 6. Reinstall Drain Plug and Tighten
Check that the drain plug washer is still in place, then thread the plug back into the oil drain hole by hand. Use your wrench or socket to tighten it back down securely.
Don’t over-tighten – just tighten firmly. This prevents the plug from loosening over time from engine vibration.
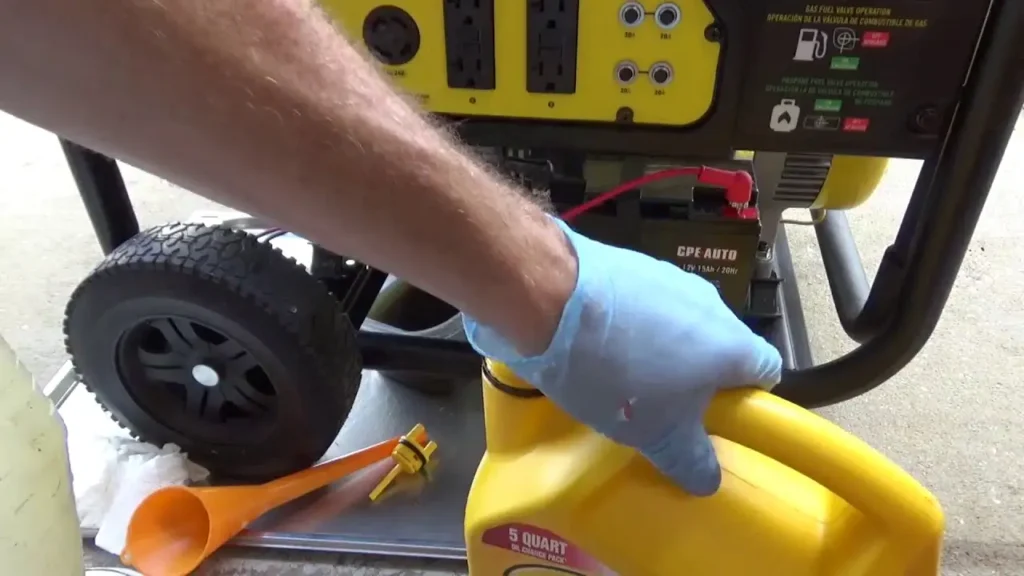
Step 7. Add New Oil Through the Fill Hole
Unscrew the oil fill cap and insert a funnel into the fill hole. Pour in the recommended quantity and type of oil stated in your owner’s manual. This varies by generator model.
Add the oil slowly and check the dipstick periodically to avoid overfilling. Make sure to recycle or properly dispose of your used oil.
Step 8. Recheck the Oil Level and Replace the Fill Cap
Once refilled, wait one minute for the oil to settle. Then check the dipstick and top off if needed until you reach the “full” mark.
Don’t overfill past the max line – this can damage your generator. Replace the oil fill cap and tighten it.
Step 9. Reconnect Spark Plug Wire
Reconnect the spark plug wire(s) to your generator if disconnected before changing the oil. Push the connector firmly over the plug terminal until fully seated.
Double-check that the wire is snapped in place securely. Then replace any other generator parts you may have removed like housing covers.
Step 10. Dispose of Used Oil Properly
Never dump hazardous fluids like used motor oil into drains, onto the ground, or into the trash. This severely pollutes the environment and is illegal in most areas.
Instead, take used oil in sealed containers to your local recycling center. Many auto parts stores also accept used oil for proper disposal.
Also Read: Best Portable Generators to Power Your Adventures in 2023
Additional Generator Oil Tips
Beyond the basics, here are some additional generator oil change tips to remember:
- Let the engine cool down before changing the oil – The oil is hot!
- Check oil level often – Top off if low between changes.
- Use fuel stabilizer if storing – Prevents fuel varnishing.
- Note hours to track changes – Reset the hour meter if needed.
- Consider synthetic oil – Lasts longer under heavy use.
- Buy quality filters – Don’t use cheap knockoffs.
- Prevent spills and drips – Use a pump instead of pouring.
- Keep oil off exhaust – Wet rags help divert drips.
- Have a shop do it – If you’re unsure of any steps.
- Dispose of rags safely – Don’t leave oily rags piled up.
Generator Oil FAQs
Let’s recap some of the most common questions about changing generator engine oil:
How often should you change the oil in a generator?
Most manufacturers recommend changing generator oil every 50-100 hours of use. Check your owner’s manual for specifics.
How many liters of oil does a generator take?
Oil capacity varies widely by generator model. Refer to your owner’s manual for the proper quantity of oil to use.
Which oil is used in a generator?
Conventional motor oils like 10W-30 or 5W-30 are recommended for most generators. Synthetic oils can also be used.
Do I need to drain oil from my generator?
Yes, you should periodically drain old dirty oil and replace it with new clean oil to protect the engine.
How long does generator oil last?
Generator oil lasts roughly 50-100 hours under normal operating conditions if regular oil changes are performed.
How do I know if my generator needs oil?
Check the dipstick routinely and if the oil level is low, top it off immediately per manufacturer guidelines.
How can I tell if my generator oil is full?
Remove the dipstick and verify oil level reaches the “Full” mark, but does not exceed the maximum fill range.
Keep Your Generator Running Smoothly
Regular oil changes are absolutely critical for maintaining your investment in a generator and keeping it running smoothly for years to come.
While your owner’s manual should always be your prime resource, I hope this guide gives you the confidence to tackle generator oil changes yourself. Just work slowly, stay safe, and properly dispose of used oil and filters.
Your generator will hum along happily after a routine oil change. And you’ll have peace of mind knowing your equipment is ready to safely deliver power whenever needed.
Have you changed your generator oil before? Let me know if you have any additional tips in the comments!